PXS TARGET PEEP
There are many. Here are the main benefits of the PXS Target Peep:
1. NEW Capture Aperture – uses LRT (Lens Retention Technology) – Verifier and Clarifier lenses gently snap into place in the Capture Aperture to prevent dropping, yet can still be easily removed for cleaning!
2. TAP – Tool-less Aperture Technology – eliminates the need for an Aperture Wrench. Aperture sizes can be quickly and easily changed by hand, without the need for any tools.
3. PLT – Protected Lens Technology – Clarifier and Verifier lenses are retained between plastic, and will never break.
4. CST – Center String Technology – places the Aperture on the exact center of the bowstring for ultimate accuracy. No left or right misses from bowstring rotation.
5. DSAT – Dual String Angle Technology – both 37- and 45-degree string angles are on the same peep housing.
The two peeps are very similar. Both are approximately the same size, and are better suited for competitive target or 3D archery. The PXS Target Peep and the Podium® Peep have the same Aperture sizes of 1/32”, 3/64”, 1/16”, 3/32”, and 1/8”. The Podium Peep also has a 5/32” Aperture, however.
The main difference in the apertures are that the PXS Target Peep uses “Capture Apertures” similar to the PXL Hunter peep to prevent dropping of the Clarifier or Verifier lenses. The Podium Peep does not have the Capture Aperture capability.
Both peeps have the capability of using Clarifiers and Verifiers. But they do use completely different size Clarifiers and Verifiers, however, so they are not interchangeable.
The Capture Aperture is the new Aperture for the PXS Target and the PXL Hunter Peep. The Capture Aperture uses LRT (Lens Retention Technology) – Verifier and Clarifier lenses gently snap into place in the Capture Aperture to prevent dropping, yet can still be easily removed for cleaning! The Capture Aperture can also be used without a Lens as a plain Aperture. Capture Aperture sizes available for the PXS Target Peep are 1/32”, 3/64”, 1/16”, 3/32”, and 1/8”. Sizes for the PXL Hunter Peep are 1/4”, 3/16” and 5/32”.
No, the PXS Target Peep and the Podium® Peep have different Aperture/Capture Aperture designs and sizes, so none of the accessories are cross-compatible with each other. The PXS Target Peep Capture Apertures will not work in the Podium® Peep, and the Podium® Peep Apertures will not work in the PXS Target Peep. And, the Clarifiers and Verifiers are completely different in the two peeps, since the PXS Target Peep uses the Capture Aperture and the Podium® Peep does not use a Capture Aperture.
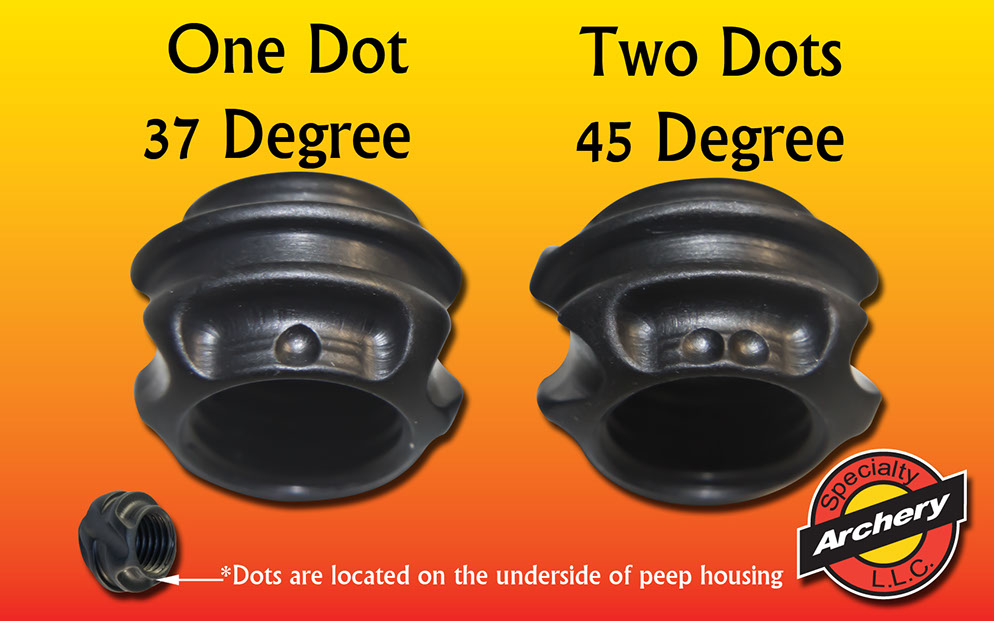
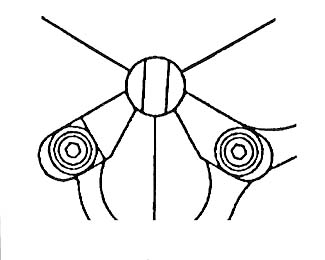
If you look on the smaller diameter, narrow section of the peep housing, you will see a small machined dot. If the peep is installed into the bowstring so that this dot is in the downward position, the string is in the 37-degree string angle grooves. If the dot is to the left side, it is in the 45-degree string angle grooves.
No, the PXS Target Peep will NOT work with our previous Apertures, Clarifiers or Verifiers.
Also, the new PXS Target Peep Apertures, PXS Target Peep Clarifiers and PXS Target Peep Verifiers will NOT work with any of the previous Specialty Archery peeps, including the Podium® Peep and Accessories.
Yes, you can use Vibra Tite with the PXS Target Peep and Capture Apertures.
The PXS Target Peep Clarifiers are available in the same strengths as our current Clarifiers – #0.5 Gold, #1 Yellow, #1.5 Ice Blue, #2 Green and #3 Red.
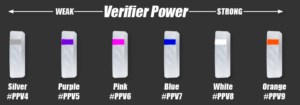
The PXS Target Peep Verifiers are available in the same strengths as our current Verifiers – #4 Silver, #5 Purple, #6 Pink, #7 Blue, #8 White and #9 Orange.
The PXS Target Peep Shade Cap increases the length of the peep, which can help reduce glare. Many shooters use the peep without this installed, however.
No, the PXS Target Peep is not compatible with our Peep Aligners.
YES, the use of a Capture Aperture is required when using a Clarifier or Verifier with the PXS Target Peep. The Capture Aperture holds the Clarifier or Verifier in place within the peep housing.
Due to the design of the PXS Target Peep, there is really no advantage to using the Peep Shade shrink tubing with the PXS Target Peep. Also, the optional PXS Target Peep Shade Cap can provide additional shading of the PXS Target Peep.
The weight will depend on which components you are using. The individual PXS Target Peep component weights are listed below:
PXS Target Peep 18.0 gr
PXS Target Peep Apertures 4.5 gr
PXS Target Peep Clarifiers/Verifiers 1.0 gr
PXS Target Peep Shade 2.5 gr
Versa² and Versa³ Scopes
There are many benefits of the Versa² Target and Versa³ 3D scopes:
NEW – Innovative knurled Red Clamp Ring attachment system allows for attachment of a wide variety of different scope accessories such as Scope Shades, a Rheostat Fiber Ring, or the new 007 UV Light Half Shade.
The new Versa² and Versa³ scopes can be used in either RH or LH configurations.
Available in 2 sizes:
Smaller Versa² Target for target and spot shooting, works with the Specialty Archery 1.345” diameter lenses (both positive power lenses and Double Vision lenses).
The larger Versa² 3D works with the Specialty Archery 1.750” diameter lens, and is best suited for 3D shooting, or for archers who prefer a larger diameter field of view.
Lenses can be installed into front or back of scope housing, or both if configured for Double Vision use.
Accessories (such as the Scope Shades, Rheostat Fiber Ring, etc.) have indexing tabs that fit into indexing notches in the Versa² and Versa³ scopes to ensure proper alignment.
NOTE: the included black plastic Lens Clamps MUST be used if the scope is used without a Scope Shade or other accessory. If the scope is used without an accessory, the lens will not be secured sufficiently, and it will rattle within the scope housing. As a result, the lens may become damaged unless the black plastic Lens Clamp is used.
Mounts using standard 10/32 scope mounting rod.
Scope housing has machined track/groove to facilitate proper scope alignment.
The new Versa² and Versa³ Glow Pins are available in .010”, .020” and .030”.
Glow Pins come in 2 lengths, shorter pin for the Versa² Target scope, and longer pin for the Versa³ 3D scope.
Glow Pin can be positioned at the 3:00, 6:00, 9:00 or 12:00 position of the scope.
Glow Pin comes with of red, green and blue fiber as well as fiber shroud.
No, the Versa² and Versa³ scopes have their own specific type of Glow Pin. They are available in .010”, .020” and .030”.
The Rheostat Fiber Ring allows the user to adjust the brightness of the Glow Pin or fiber for individual target presentations.
Rotating the cover allows the user to expose more fiber optic to increase pin brightness, or cover up fiber optic to reduce pin brightness!
Rheostat Fiber Ring can be used with a Glow Pin OR with a drilled lens and fiber (eliminates the distraction of seeing the fiber pin).
The Rheostat Fiber Ring comes with green fiber installed, but also includes red and blue fiber.
The Specialty Archery Scope Shade is a great accessory for the Versa² and Versa³ Scopes.
Shades reduce glare on bright days or with harsh indoor lighting conditions.
Shades can be installed on the front, the back, or both sides of the scope housing.
There are 2 ways on which the Versa² and Versa³ scopes are compatible when using the Super 7 Bright Sight:
- The Versa² and Versa³ 007 Glow Ring (RH or LH) is for use with a “traditional” style 007 setup with a fiber optic sight pin. Shines light into fiber similar to the original 007 attachment. Available in .010”, .020” or .030”.
- Versa² and Versa³ 007 UV Half Shade is for shining the Specialty Archery 007-UV Light cable onto a fluorescent adhesive dot, a Glow Pin with fiber optic, or fiber optic in a drilled lens. NOTE: MUST use Specialty Archery’s 007-UV light cable.
The Versa² Target scope uses 1.345” diameter lenses.
The Versa³ 3D scope uses 1.750” diameter lenses.
The Versa² and Versa³ scopes use the #637 Long Levels. They are available in Red, Blue and Yellow. They come standard with the Yellow level installed.
The Versa² and Versa³ scopes attach using a standard 10/32 scope mounting rod, which is compatible with nearly all sights in the archery industry.
The Scope Blocker is designed to obscure your peripheral vision around the scope and help the archer focus on the target.
Can be easily installed or removed by snapping into place.
Works for both RH or LH applications.
There are indeed Scope Decals available for the Versa² and Versa³ scopes in fluorescent Chartreuse, Orange, and Green.
The Scope Decals promotes proper peep and scope alignment when at full draw for maximum accuracy.
PXL Hunter Peep
There are many. Here are the main benefits of the PXL Hunter Peep:
1. NEW Capture Aperture – uses LRT (Lens Retention Technology) – Verifier and Clarifier lenses gently snap into place in the Capture Aperture to prevent dropping, yet can still be easily removed for cleaning!
2. TAP – Tool-less Aperture Technology – eliminates the need for an Aperture Wrench. Aperture sizes can be quickly and easily changed by hand, without the need for any tools.
3. PLT – Protected Lens Technology – Clarifier and Verifier lenses are retained between plastic, and will never break.
4. CST – Center String Technology – places the Aperture on the exact center of the bowstring for ultimate accuracy. No left or right misses from bowstring rotation.
5. DSAT – Dual String Angle Technology – both 37- and 45-degree string angles are on the same peep housing.
The PXL Hunter Peep has larger Apertures, and is better suited for hunting. The PXL Hunter Peep has Apertures of 1/4”, 3/16” and 5/32”.
The Podium® Peep has smaller Apertures, and is generally better suited for competitive target or 3D archery. The Podium Peep has Apertures of 1/32”, 3/64”, 1/16”, 3/32”, 1/8” and 5/32”.
Both have the capability of using Clarifiers and Verifiers, however. But they do use different size Clarifiers and Verifiers, however.
The Capture Aperture is the new Aperture for the PXL Hunter Peep. The Capture Aperture uses LRT (Lens Retention Technology) – Verifier and Clarifier lenses gently snap into place in the Capture Aperture to prevent dropping, yet can still be easily removed for cleaning! The Capture Aperture can also be used without a Lens as a plain Aperture. Sizes available are 1/4”, 3/16” and 5/32”.
No, the PXL Hunter and the Podium® Peep are different sizes, so none of the accessories are cross-compatible with each other.
If you look on the smaller diameter, narrow section of the peep housing, you will see a small machined dot. If the peep is installed into the bowstring so that this dot is in the downward position, the string is in the 37-degree string angle grooves. If the dot is to the left side, it is in the 45-degree string angle grooves.
Yes, the PXL Hunter Peep does come in the 1/8″diameter.
No, the PXL Hunter Peep will not work with our previous Apertures, Clarifiers or Verifiers.
Also, the new PXL Hunter Peep Apertures, PXL Hunter Peep Clarifiers and PXL Hunter Peep Verifiers will not work with any of the previous Specialty Archery peeps, including the Podium® Peep and Accessories.
Yes, you can use Vibra Tite with the PXL Hunter Peep and Apertures.
The PXL Hunter Peep Clarifiers are available in the same strengths as our current Clarifiers – #0.5 Gold, #1 Yellow, #1.5 Ice Blue, #2 Green and #3 Red.
The PXL Hunter Peep Verifiers are available in the same strengths as our current Verifiers – #4 Silver, #5 Purple, #6 Pink, #7 Blue, #8 White and #9 Orange.
The PXL Hunter Peep Shade Cap increases the length of the peep, which can help reduce glare. Many shooters use the peep without this installed, however.
No, the PXL Hunter Peep is not compatible with our Peep Aligners.
No, the use of an Aperture is required when using a Clarifier or Verifier with the PXL Hunter Peep. The Aperture will hold the Clarifier or Verifier in place within the peep housing.
Due to the design of the PXL Hunter Peep, there is really no advantage to using the Peep Shade shrink tubing with the PXL Hunter Peep. Also, the optional PXL Hunter Peep Shade Cap can provide additional shading of the PXL Hunter Peep.
The weight will depend on which components you are using. The individual PXL Hunter Peep component weights are listed below:
PXL Hunter Peep – 30.5 gr
PXL Hunter Peep Apertures – 7.5 gr
PXL Hunter Peep Clarifiers/Verifiers – 3.5 gr
PXL Hunter Peep Shade – 3.0 gr
APERTURES
- If you hear a buzzing sound, this means your Aperture has most likely vibrated loose.
- First, make sure the Aperture is screwed in tightly, but do not over tighten. Use Specialty Archery’s Dual Hex Wrench (210078). NOTE: do not use a metal Allen wrench to tighten your aperture, or you will most likely mark up the inside of your aperture. If this does not help, you can put a drop of Vibra-Tite VC 3 (VC3), Teflon tape, bow wax, or any other non-permanent binding agent on the threads. This can be found online, or in fastener stores such as Fastenal.
- Be sure to tighten your Aperture before each use.
- Bow vibration can loosen the Aperture over time.
CLARIFIERS
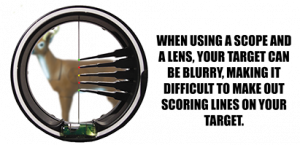
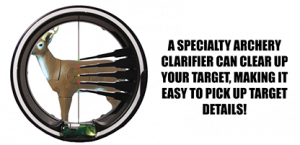
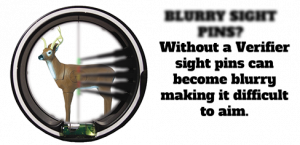
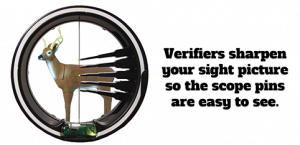
A Verifier is used when you shoot with pins to clear up the pins, and a Clarifier is used when you shoot with a scope and a lens to clear up the target. Verifiers are generally preferred by older archers who have lost some ability to focus on objects that are close-up, such as sight pins. Clarifiers are usually preferred by tournament archers who want to see the target more clearly when looking through a scope.
A Clarifier is a lens installed in the peep that will allow you to see the target more clearly when used with another lens in your scope or sight. Clarifiers are only used if you shoot with a scope (or pin sight) with a lens. Clarifiers are meant for the 2 lenses to work together to provide a clearer target image.
Look through the side of the clarifier with the hex opening where the Dual Aperture wrench (#210078) fits.
Clarifiers are available in 5 powers, and in 6 different hole sizes. The first step in using a clarifier is to choose the correct hole size (see Aperture section). If you are using a peep with a certain aperture hole size, we recommend using the same size when selecting a clarifier. The best way to choose the correct Clarifier power is to find an archery dealer that has our Clarifier Tool. The following link will take you to our Dealer page.
To select the correct clarifier power, see suggestions below:
2 power lens we suggest trying #0.5 or #1 Clarifier
3 power lens we suggest trying #0.5 or #1 Clarifier
4 power lens we suggest trying #0.5, #1, #1.5 or #2 Clarifier
5 power lens we suggest trying #0.5, #1, #1.5 or #2 Clarifier
6 power lens we suggest trying #1, #1.5 or #2 Clarifier
7 power lens we suggest trying #1.5, #2 or #3 Clarifier
8 power lens we suggest trying #2 or #3 Clarifier
Keep in mind the stronger the clarifier, the more it will make your aiming dot blurry. You can compensate for this by using a larger aiming dot, or by using a brighter dot such as a fiber optic pin. A compromise between a blurred dot or clear target is sometimes necessary.
To select the hole size for your Clarifier, you should select one that frames your scope housing. See suggestions below:
Scope: Suggested Hole Size
1 3/8″ (#040-2) or Versa² (#V2TG): 1/32”, 3/64”, or 1/16” aperture
1 5/8” (#040-1): 3/64”, 1/16”, or 3/32” aperture
Super D (#1011) or Versa³ (#V33D): 3/32”, 1/8”, or Large aperture
Low light conditions will restrict your view of the target when using a Clarifier. Also rain or fog can allow water to build up on the lens thus restricting its use. Using Specialty’s lens treatment solution (641) can aid in removing water from the peep lens. Specialty Archery has foam applicators (501) which can also be used to weep the water off the lens. In extremely high precipitation conditions, we recommend removing the clarifier.
Specialty Archery’s Peep Guard (#PG1-BLK) can be installed to protect the peep and clarifier from dust and precipitation.
A Clarifier may fog just like a riflescope lens or binocular lens. To minimize this, we suggest storing your Clarifier in a place close to the outside temperature you will be hunting or shooting in, such as your garage. Use of Specialty Archery Anti-Fog Cleaning Solution (641) can also be helpful. You may cover the peep with plastic wrap or aluminum foil to keep moisture out when hunting in rainy conditions, just remember to remove the covering before shooting.
Cleaning Verifiers and Clarifier lenses can indeed be difficult due to the small areas of the lenses. Just remember that the Clarifier or Verifier lens is just like the lens in your binoculars and riflescope, and care should be used when cleaning.
The best ways we have found to clean the lenses are as follows:
1.Using our Lens Brite Anti Fog Lens Cleaner (#641) and Foam Applicator Lens Cleaner (#501), place a drop of the lens cleaner on one end of a foam applicator and clean the lens using that. Once the lens is clean, it can be dried with the opposite end of the foam applicator, or some other lens cleaner such as lens paper or our Soft-Tek Micro Fiber Lens Cloth (#642). To use the lens paper or cloth, you will need to fold it up into a “point” to get into the surface of the lens.
2.Another method is to use a toothpick, and clip the pointed end of the toothpick off using a fingernail clipper. This now creates a small, flat surface on the toothpick. Then, drape a lens cloth (#642, Soft-Tek Micro Fiber Lens Cloth works well) over the flattened end of the toothpick, and use that to clean the lens. You may also want to add a drop of lens cleaning solution to the lens cloth as well. However, care must be used with this method to ensure you do not force the toothpick through the lens cloth, which can damage the lens coating if excessive force is used.
3.If is simply dust or pollen that needs to be cleaned from the surface of the lens, you can also use compressed air spray cans that are used to clean dust from electronics or computer keyboards.
NOTE: Never use a glass cleaner to clean any type of optical lens. Glass cleaners often contain ammonia, and are much harsher than lens cleaners. Glass cleaners will usually damage or remove the anti-reflective coating found on optical lenses. Also, never use alcohol or acetone to clean lenses. Use a lens cleaning solution only.
Specialty Archery’s Peep Guard (#PG1-BLK) can be installed to protect the peep and Clarifier from dust and precipitation.
If you hear a buzzing sound, this means your Clarifier has vibrated loose. First, make sure the Clarifier is screwed in tight, but do not over tighten. Use Specialty Archery’s Dual Hex Wrench (210078). If this does not help, you can put a drop of Vibra-Tite VC 3 (VC3), Teflon tape, bow wax, or any other non-permanent binding agent on the threads. This can be found online, or in fastener stores such as Fastenal. Be sure to tighten your Clarifier before each use. Bow vibration can loosen the Clarifier over time. If the Clarifier still vibrates after tightening, you may need to return the Clarifier to Specialty Archery to have the lens re-crimped in place.
VERIFIERS
A Verifier is used when you shoot with pins to clear up the pins, and a Clarifier is used when you shoot with a scope and a lens to clear up the target. Verifiers are generally preferred by older archers who have lost some ability to focus on objects that are close-up, such as sight pins. Clarifiers are usually preferred by tournament archers who want to see the target more clearly when looking through a scope.
A Verifier will work for you if you need reading glasses but can see well at a distance without glasses. The best way to choose the correct Verifier is to find an archery dealer that has our Verifier Tool. The following link will take you to our Dealer page.
Usually people in their early 40’s can get by with the weakest (#4-#5) Verifier. The older you are, or the worse your vision is, the stronger Verifier you will need. There are 6 strengths from #4 to #9. The #4, #5 and #6 are the most popular Verifier strengths. We usually recommend a #4 or #5 if a shooter has mild vision problems or if they have been noticing vision problems recently. We recommend the #6 if they have more severe vision problems or if they have been dealing with vision problems for a while. We usually do not recommend starting out with anything stronger than a #6. What happens frequently is that a shooter will start off with a #6 and need to move up to a #7 after a year or two. Unfortunately, knowing your prescription strength does not help much when selecting a Verifier power.
Keep in mind if you go too strong you may blur your target. We strongly recommend you find a dealer in your area with the Verifier Display. The #4, #5 and #6 Verifiers are the most commonly used ones.
If you have astigmatism or are near sighted, the Verifier will probably not work for you. Some shooters tell us they shoot with their glasses on, and others tell us they take their glasses off.
Try both and do whatever works best for you.
If your target is too blurry, you are using too strong a Verifier. Try a weaker power. We tell shooters to try finding a “happy medium” between clear pins and a clear target.
If your pins are still too blurry, you will need to try a stronger power verifier. However, a stringer verifier will also make your downrange target more blurry. We tell shooters to try finding a “happy medium” between clear pins and a clear target.
Look through the side of the Verifier with the opening where the aperture wrench fits.
A Verifier may fog just like a riflescope lens or binocular lens. To minimize this, we suggest storing your Verifier in a place close to the outside temperature you will be hunting or shooting in, such as your garage. Use of Specialty Archery Anti-Fog Cleaning Solution (641) can also be helpful. You may cover the peep with plastic wrap or aluminum foil to keep moisture out when hunting in rainy conditions, just remember to remove the covering before shooting. If it is raining heavily, we recommend removing the Verifier temporarily until the rain subsides.
Cleaning Verifiers and Clarifier lenses can indeed be difficult due to the small areas of the lenses. Just remember that the Clarifier or Verifier lens is just like the lens in your binoculars and riflescope, and care should be used when cleaning.
The best ways we have found to clean the lenses are as follows:
1.Using our Lens Brite Anti Fog Lens Cleaner (#641) and Foam Applicator Lens Cleaner (#501), place a drop of the lens cleaner on one end of a foam applicator and clean the lens using that. Once the lens is clean, it can be dried with the opposite end of the foam applicator, or some other lens cleaner such as lens paper or our Soft-Tek Micro Fiber Lens Cloth (#642). To use the lens paper or cloth, you will need to fold it up into a “point” to get into the surface of the lens.
2.Another method is to use a toothpick, and clip the pointed end of the toothpick off using a fingernail clipper. This now creates a small, flat surface on the toothpick. Then, drape a lens cloth (#642, Soft-Tek Micro Fiber Lens Cloth works well) over the flattened end of the toothpick, and use that to clean the lens. You may also want to add a drop of lens cleaning solution to the lens cloth as well. However, care must be used with this method to ensure you do not force the toothpick through the lens cloth, which can damage the lens coating if excessive force is used.
If you hear a buzzing sound, this means your Clarifier has vibrated loose. First, make sure the Verifier is screwed in tight, but do not over tighten. Use Specialty Archery’s Dual Hex Wrench (210078). If this does not help, you can put a drop of Vibra-Tite VC 3 (VC3), Teflon tape, bow wax, or any other non-permanent binding agent on the threads. This can be found online, or in fastener stores such as Fastenal. Be sure to tighten your Verifier before each use. Bow vibration can loosen the Verifier over time. If the Verifier still vibrates after tightening, you may need to return the Verifier to Specialty Archery to have the lens re-crimped in place.
We have 6 standard sizes of Verifiers: 1/8”, Large, PXLH (5/32″, 3/16″ or 1/4″) and 5/16″. *Custom Verifiers also available in 1/32″, 3/64″, 1/16″ & 3/32″.
The 1/8” and smaller Verifiers (750-10, 750-11, 750-12, 750-13, 750-14, and 750-15) fit the 749-37, 749-37H, 749-37PS, 749-37UL, 749-45, 749-45H, 749-45PS, 749-45UL, 750, and 750PS peeps. The 1/8” Verifiers also fit in the 749-37L, 749-37LH, 753, and 753LH peeps with the aid of a peep reducer (753-3).
The Large Verifiers (753-10, 753-11, 753-12, 753-13, 753-14, and 753-15) fit the 749-37L, 749-37LH, 753, and 753LH peeps. The PXLH or Large size is popular for hunting since it will let in more light for a brighter sight picture.
The 5/16” Verifiers (755-10, 755-11, 755-12, 755-13, 755-14, and 755-15) fit the 749-37XL 5/16” peeps only. The 5/16” verifiers will not fit into any other Specialty Archery peeps. The 5/16” size is also popular for hunting since it will let in more light for a brighter sight picture.
The Podium Peep uses it’s own Verifier lenses (PPV) and is not compatible with any of the above Verifiers.
The PXL Hunter Peep also uses it’s own Verifier lens (PXLHV) and is not compatible with any of the above Verifiers.
PODIUM PEEPS®
There are many. Here are the main benefits of the Podium Peep®:
- Ability to easily remove and clean the Clarifier or Verifier lens.
- TAP – Tool-less Aperture Technology – eliminates the need for an Aperture Wrench. Aperture sizes can be quickly and easily changed by hand, without the need for any tools.
- PLT – Protected Lens Technology – Clarifier and Verifier lenses are retained between plastic, and will never break.
- CST – Center String Technology – places the Aperture on the exact center of the bowstring for ultimate accuracy. No left or right misses from bowstring rotation.
- DSAT – Dual String Angle Technology – both 37- and 45-degree string angles are on the same peep housing.
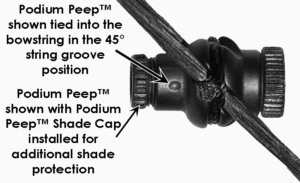
If you look on the smaller diameter, narrow section of the peep housing, you will see a small machined dot. If the peep is installed into the bowstring so that this dot is in the downward position, the string is in the 37-degree string angle grooves. If the dot is to the left side, it is in the 45-degree string angle grooves.
No, the Podium Peep® does not currently come in the larger diameters. The largest Aperture currently available for the Podium Peep is 5/32”. If you are looking for a larger diameter, we would suggest the PXL Hunter peep. This peep is available with 5/32″, 3/16″ and 1/4″ Aperture sizes.
No, the Podium Peep® will not work with our previous Apertures, Clarifiers or Verifiers. Also, the new Podium Peep® Apertures, Podium Peep® Clarifiers and Podium Peep® Verifiers will not work with any of the previous Specialty Archery peeps.
Yes, you can use Vibra Tite with the Podium Peep® and Apertures.
The Podium Peep® Shade Cap increases the length of the peep, which can help reduce glare. Many shooters use the peep without this installed, however.
The inside diameter of the Podium Peep® with no Aperture installed is 0.175”.
No, the Podium Peep® is not compatible with our Peep Aligners.
No, the use of an Aperture is required when using a Clarifier or Verifier with the Podium Peep®. The Aperture will hold the Clarifier or Verifier in place within the peep housing.
Due to the design of the Podium Peep®, there is really no advantage to using the Peep Shade shrink tubing with the Podium Peep®. Also, the optional Podium Peep® Shade Cap can provide additional shading of the Podium Peep®.
The weight will depend on which components you are using. The individual Podium Peep® component weights are listed below:
Podium Peep® 19.0 gr
Podium Peep® Apertures 3.5 gr
Podium Peep® Clarifiers/Verifiers 2.0 gr
Podium Peep® Shade 3.0 gr
PEEPS
Specialty Archery peeps are threaded to accept different size Apertures, Clarifiers or Verifiers. Specialty Archery has many different models of peeps in 7 different colors.
We have 4 models of our smaller “standard” size of peeps, which are the 749-37 Pro Series (PS), 749-37 Ultra Lite (UL), 749-45PS and 749-45UL. These smaller “standard” size peeps are available in 37 or 45 degree string angles. The Pro Series (PS) peeps are hooded, and the Ultra Lite (UL) peeps are non-hooded. 749-37PS and 749-37UL have the 37 degree string angle, and the 749-45PS and 749-45UL have the 45 degree string angle.
Similar to the “standard” size peeps is the Podium Peep (PP). The Podium Peep has both 37 and 45 degree string angles on the same peep housing.
We also have 2 models of our Large size of peeps, which are the 749-37LH (LH = Large Hooded) and 749-37L (L = Large) peep. These larger peeps are only available in 37 degree string angles. These are very popular peeps for hunting.
Our largest peep is the 5/16” XL peep. These are also only available in a 37 degree string angle, and are also extremely popular for hunting.
In 2020, we introduced our PXL Hunter Peep, which is similar in design to the Podium Peep, but in a larger size that is more suitable for hunting. The PXL Hunter Peep uses apertures of 1/4″, 3/16″ and 5/32″. The PXL Hunter Peep has both 37 and 45 degree string angles on the same peep housing.
The hole is 0.180” (approximately 3/16″) with nothing installed in the peep.
The hole is 0.260” (approximately 1/4″) with nothing installed in the Peep.
The hole is 0.312” (approximately 5/16″) with nothing installed in the peep.
The 749-37PS, 749-37UL, 749-45PS, 749-45UL, and the 750PS Super Hunter Peep will accept all 1/8” (and smaller) Carifiers, 1/8” (and smaller) Aertures, and the 1/8” Vrifiers. NOTE: these peeps will not accept the Large Verifiers or Clarifiers. The Large Verifiers and Clarifiers are too large to fit into these peeps.
The 749-37L, 749-37LH and the 753LH Super Hunter Peep will accept the Large Verifiers and Large Clarifiers. NOTE: these larger ¼” peeps will also accept all 1/8” Clarifiers, 1/8” apertures, and the 1/8” verifiers with the use of the peep reducer (#753-3).
The 749-37XL peep only accepts the 5/16” Verifiers. It does not have a reducer, and is not compatible with ¼” and smaller Verifiers, Clarifiers, or Apertures.
The Podium Peep only accepts the Podium Peep Apertures (PPA), Podium Peep Verifiers (PPV), and Podium Peep Clarifiers (PPC). It is NOT compatible with any of the original Apertures, Clarifiers or Verifiers.
Look through the side you screw the Apertures into. On the hooded peeps this will be the side with the hood.
We have 2 different sizes of Peep Aligners which use rubber alignment tubing. These mount directly over the top of the peep housing. The Peep Aligner Large (PAL) is for our Large Peep Housings 749-37LH and 749-37L. The Peep Aligner Standard (PAS) works with our standard size peeps 749-37PS, 749-37UL, 749-45PS and 749-45UL. We also offer 2 complete kits which include all of the items needed to use alignment tubing. These kits are part number 750PS, which includes a standard size hooded Pro Series Peep, and 753LH, which includes the Large Hooded Peep.
The hood reduces glare on Verifiers and Clarifiers when in bright sunlight or fluorescent light and helps shield the lens from dust and moisture. We usually recommend using a hooded peep if you are going to be using a Clarifier or Verifier.
On the underside of the standard peep, there will be one machined dot if it is a 37 degree peep and 2 dots if it is a 45 degree peep.
NOTE: the ¼” Large (#749-37L), ¼” Large Hooded (#749-37LH), and 5/16″ (#749-37XL) peeps are available with a 37 degree string angle only. The ¼” and 5/16″ peeps are not available with a 45 degree string angle.
See the various charts below. The first step is to determine the bow’s brace height. This is the distance from the string to the thumb web section of the bow’s grip. Round this number up or down to the closest inch. (For example, a 6¼” brace height bow would use the 6” brace height chart. A 6¾” brace height bow would use the 7” brace height chart.) Next, find the bow’s axle-to-axle length on the left axis of the chart. The final step is to move horizontally within that row until you come to the column with the bow’s draw length. This will indicate the preferred peep string angle for your bow. NOTE: if your setup falls on the dividing line between the 37 and 45 degree sections of the charts, you can use either string angle. For example, a 7” brace height bow, 36” axle-to-axle, and a 27½” draw length falls right on the boundary, and could use either a 37 or 45 degree string angle peep housing.
PRO PRESS, PRO DRAW & ACCESSORIES
Most bows (and most crossbows as well) can be pressed using the Pro Press.
Refer to your bow’s owner’s manual before placing your bow in any press.
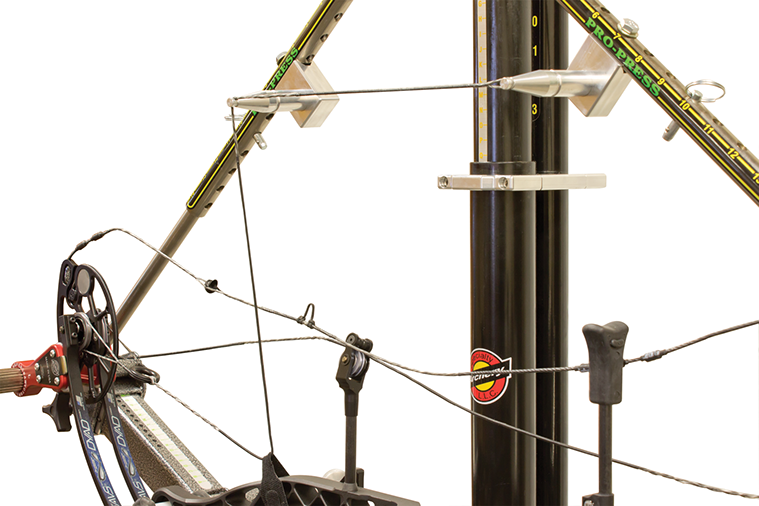
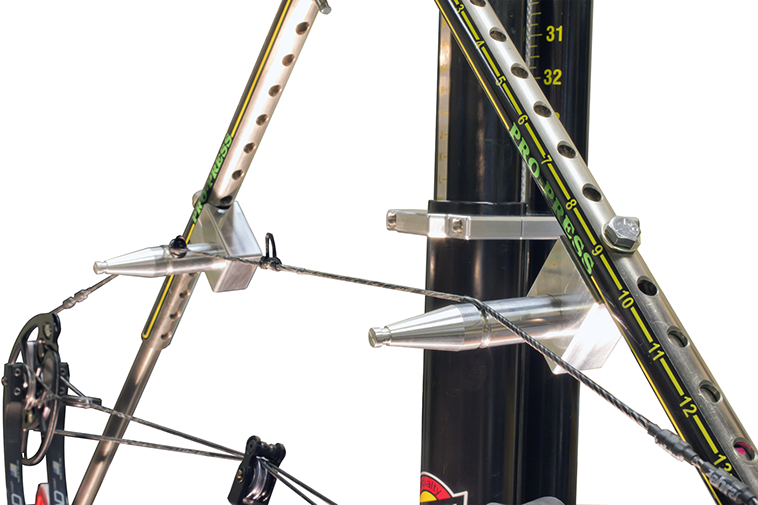
The Pro Press is the finest bow press in the archery industry. The Pro Press can effectively press nearly all bows in the archery industry while putting minimum stress on the bow’s components. With the addition of the Pro Draw, the user is able to synchronize the bow’s cams in a few minutes, without removing the bow from the press. No longer does the user have to take the bow off the press, place it on a draw board, and then back onto the press. This feature alone speeds up a bow’s setup time by 20-25 minutes.
When a bow is first set up in the Pro Press, the user records the settings on the Pro Press Mapping Worksheet. Anytime the bow needs to be placed in the press in the future, the user refers to these settings to speed up the Pro Press set-up. The locations that will need to be documented are:
1.Main Jack setting – the starting height of the jack.
2.Main Tube setting – the width of the Riser Supports.
3.Limb Ears – the location on the Splined Shafts.
4.Swing Arms – the position of the Limb Sliders on the Swing Arms.
5.Angle Adjustment Rods – the holes located in the Angle Adjustment rods.
Yes, the Pro Press can press most crossbows with ease. However, there are a couple points to consider. Because of the narrow riser section found on most crossbows, the Riser Supports will need to be moved inwards (towards each other) until the Riser Support Pegs are placed at the junction of the limbs and the riser. The second consideration is that the jack will need to be raised to allow for sufficient clearance for the crossbow’s optics.
On many bows with aggressive past parallel limbs, there is a tendency of the bow to be forced downwards out of the press when pressure is applied to the limbs during pressing. The Limb Safety Clips and the Split Limb Safety Clips prevent this by firmly securing the bow in the press. NOTE: the Split Limb Safety Clips work only on bows with spit limbs, and are not compatible with bows that have a suppressor mount between the limbs (several Hoyt models).
CLICK HERE TO SEE THE PRO PRESS SAFETY FEATURES
The marks are used to check a bow’s draw length throughout the draw cycle. This can be used to exactly match the draw length of 2 different bows, or to plot a draw force curve when used with the optional scale.
ATA standards state that a bow’s draw length is measured by adding 1.75” to the brace height (the distance from the bowstring to the thumb web section of the bow’s grip). For example, if a bow has a 7” brace height, we start the O-ring at 7” + 1.75” = 8.75”. Before moving the O-ring to the correct starting location, be sure to remove the slack from the rope on the Pro Draw to calculate draw length.
The Pro Draw can handle a bow of 100 lbs. of draw weight.
This is the lubrication port for the gearbox. To properly apply lube to the gearbox, remove the threaded hex cover and apply gear lube oil by pouring directly into the exposed reservoir port. Apply oil until you can visually see the oil in the bottom of the reservoir. Be sure not to overfill, or spilling will result. When full, replace the threaded hex on top of the elbow. This should only need to be done a couple times annually.
We cannot guarantee the Pro Press Stand will work with other manufacturers’ bow presses. We can guarantee that it will work with the Pro Press.
The Pro Press scale has a maximum capacity of 110 lbs. (50 kg). The scale measures in 1 oz. increments.
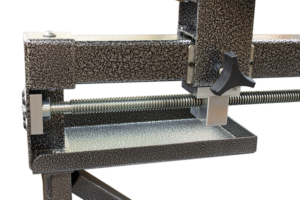
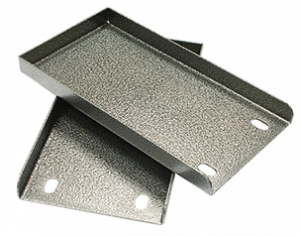
The trays are mounted on the underside of the Pro Press, by using the bolts for mounting the Pro Press to the Pro Press Stand. There are several mounting options for the trays. They may be mounted directly under the main tube and ACME threaded rod pointing towards the inside of the Pro Press (as shown in picture), they may be oriented outwards away from the ends of the Pro Press, or you may use only one mounting bolt and mount the trays at a 90 degree angle to the main tube.
The Serving Jigs are bolted on the underside of the Angle Adjustment Rods on the Pro Press. The bolts are placed through the holes on the Angle Adjustment Rods and secured in place using the bolts provided.
For center servings, the bow is placed into the press and the bowstring is placed across the groove on the larger diameter section of the jigs. Then, the press is raised to put tension on the bowstring, and to allow for sufficient clearance of the serving jig.
For end loop servings, the cable is removed from the cam and looped over the small peg on the end of the serving jig, and ran back over to the small peg on the end of the opposite serving jig. Then, the strap is wrapped around the cable and around the bow riser, putting tension on the cable for serving. NOTE: due to the large number of possible string, cable and serving combinations, some modification to this procedure may need to be employed.
Yes, the Pro Press is a Hoyt authorized press.
The Pro Press Conversion Kit allows the user to convert the original Sure-Loc X-press for use with the Pro Press Limb Ears.
Limb Ears offer increased flexibility in placement as well as reduced stress on the bow limbs and riser.
Increased ease in mounting and use of the Specialty Archery Pro Draw to create the ultimate bow tuning press and draw board system.
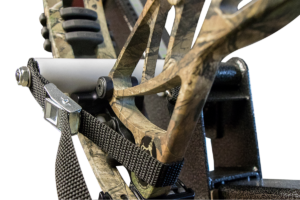
Includes new Safety Straps.
NOTE: The Pro Press Conversion Kit does NOT include the Hex Drive Crank Handle or the Hex Drive Shaft found on the Specialty Archery Pro Press. The Pro Press Hex Drive Conversion Kit (#PRP-HX) allows you to convert your original X-Press flat-style crank handle to the same 9/16” Hex Drive system found on the current Pro Press and Pro Draw. Allows the same Hex Drive Crank Handle to be used on both the press and the Pro Draw.
Will this work to convert other bow presses to the Limb Ears?
No, the Pro Press Conversion Kit will only work with the original Sure Loc X-Press. It will not work for any other presses on the market. It will also not work on the newer style Sure Loc presses with the large red spoked wheels.
Is the Hex Drive Conversion Kit required if I want to convert my X-Press for use with the Limb Ears?
No, you can still use the original flat-style crank handle that your original X-Press came with. You do not need to convert your press to the Hex Drive Crank Handle to use it with the Limb Ears. But, if you ever install the Pro Draw, you will need a Hex Shaft Crank Handle for operation of the Pro Draw. The original flat-style crank handle will not work with the Pro Draw.
How do the new Safety Straps work?
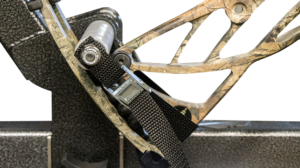
The new Safety Straps are similar to the original Limb Safety Clips and Split Limb Safety Clips. The Safety Straps help keep the bow contained within the press during operation. These are especially important when pressing past-parallel limb bows, but we recommend their use for all bows.
The Hex Drive Conversion Kit allows you to convert your original X-Press flat-style crank handle to the same 9/16” Hex Drive system found on the current Pro Press and Pro Draw. This will allow the same Hex Drive Crank Handle to be used on both the press and the Pro Draw.
Is the Hex Drive Conversion Kit required if I want to convert my X-Press for use with the Limb Ears?
No, you can still use the original flat-style crank handle that your original X-Press came with. You do not need to convert your press to the Hex Drive Crank Handle to use it with the Limb Ears. But, if you ever install the Pro Draw, you will need a Hex Shaft Crank Handle for operation of the Pro Draw. The original flat-style crank handle will not work with the Pro Draw.
SUPER SERVERS & ACCESSORIES
The SS-600, SS-800 and the QS-350 can stretch bowstrings at approximately 375 lbs. when coupled with a 150 max psi air compressor. Warning: do not exceed 150 psi of compressor pressure on the SS-600, SS-800 or QS-350.
The SS-2500 is equipped with a larger air cylinder, and can therefore apply greater tension to the bowstrings. With the SS-2500, you can stretch up to a maximum of 450 lbs. using a 100 psi air compressor. However, when using this higher tension cylinder, care must be used to properly secure the unistrut to an extremely rigid base, or misalignment of the cylinders can occur during operation. Warning: do not exceed 100 psi of compressor pressure on the SS-2500.
The SS-2500 serves bowstrings at a maximum of 2500 RPM, and twists strings at a maximum of 600 RPM.
The SS-800 serves bowstrings at a maximum of 800 RPM, and twists strings at a maximum of 300 RPM.
The SS-600 serves bowstrings at a maximum of 600 RPM, and twists strings at a max of 300 RPM.
There are other speed settings, but these are the maximum speeds for each machine.
There are several different methods, but we have found the best to be a PVC frame that allows the hand serving jig to ride along when the machine is serving. You will need ½” PVC tube for the vertical sections of the frame that fit into the unistrut channel, and the horizontal section can be whatever diameter and length you choose.
Another simple method of operating the Super Servers hands-free is to simply secure a weight to your serving jig to keep it from “flipping over” the top of the bowstring while serving.
No, the machine is fine. The motors are designed to “stall” if excessive resistance is encountered during operation. However, this will create a loud and annoying noise when it happens. All you need to do is manually line up the hooks again, and resume use. When you manually turn the hooks to realign, if the machine is powered on, there will be resistance felt and there will be a “clunking” as the string hooks are rotated. As mentioned, this does not damage the machine in any way. If you were in the middle of building a string when this occurs, you will need to re-twist to the string until it is at the original starting length. Then, you can continue building the string.
Unistrut is a standard building item that is readily found in almost any hardware or home improvement store. It is usually found in the electrical hardware building materials section, and it comes in standard lengths of 120 inches, or 10 feet. The reason unistrut is not included with the Super Servers or QS-350 is because shipping these lengths would be more expensive than purchasing them.
With the SS-800 or SS-600 mounted on 120” unistrut, you can build a bowstring of up to 108”, which is longer than most standard bowstrings on the market today. 120” is the standard length that unistrut comes in.
With the SS-2500, it is recommended to use unistrut that is 12 feet in length when completed. This can be done by purchasing unistrut in 20’ sections and cutting these to 12’ lengths, or by purchasing 10’ sections and splicing the unistrut together. Caution must be used to ensure the spliced sections of unistrut are mounted straight. If this method is used, we recommend putting the shortened splice ends of the unistrut at the Fixed Motor Assembly end of the SS-2500.
A lot of bowstring builders are accustomed to spinning the hand serving jig around the bowstring when applying serving. With the Super Servers, the bowstring is spinning instead of the serving jig. Consequently, when using the Super Servers many string builders inadvertently put the serving onto the bowstring backwards, against the twists, instead of in the same direction as the twists. Make sure the serving is being applied in the same direction as the bowstring is twisted. If the serving is applied opposite the twists in the bowstring, it will cause peep rotation. Basically, if you are experiencing this issue, you need to reverse the direction you apply the serving. For example:
If you twist “Forward”, when serving the string from right to left, the serving direction should be “Forward”. When serving from left to right, the serving direction should be “Reverse”.
If you twist “Reverse”, when serving the string from right to left, the serving direction should be “Reverse”. When serving from left to right, the serving direction should be “Forward”.
The Super Server power supply box is compatible with 110-240 VAC. However, you may need to obtain either a replacement power cable or a voltage converter to work with your country’s power specifications.
http://www.datapro.net/catalog/international-power-cables.html
The Quick Stretch 350 (QS-350) uses compressed air to stretch bowstrings. One advantage to using compressed air to stretch bowstrings is that it stays at a consistent tension, whereas springs or other methods can change tension as the bowstring stretches and lengthens under pressure over time. Compressed air will maintain a consistent tension regardless of string length changes that occur during the stretching process.
Due to the high speeds of the SS-2500, the Bobbin Attachment is not compatible on the SS-2500.
The foot pedal allows the motors of the SS-800 and SS-2500 to be activated by depressing the foot pedal.
No, the foot pedal will not work on the SS-600.
The foot pedal function of your SS-800 will need to be activated before it can be used. Activation is performed by entering a 6 digit activation code that is specific to your SS-800. Please see the instructions included with the SS-800 for the procedure.
No, the pressure on the compressor and in the airlines will be the same regardless if only a Super Server is connected to the compressor, or if there are multiple QS-350 stretchers connected as well. The air pressure in the airlines will be whatever the compressor psi is set to.
The Manifold Kit (SS-QS-MK) consists of 25 feet of polyethylene air hose (customer cuts to desired length using a sharp razor knife), a standard ¼” NPTF Quick Coupler, a 4 position Manifold Assembly, and all the necessary plugs and fittings. This kit will allow the Super Server to be coupled with up to 3 QS-350 machines, and diverts air pressure to each machine. However, you will need to purchase an additional pressure relieving-style air regulator and 150 psi gauge to vary and monitor the air pressure coming into your Super Server.
The 10 Port Manifold Kit (SS-QS-MK-10) consists of 75 feet of polyethylene air hose (customer cuts to desired length using a sharp razor knife), a standard ¼” NPTF Quick Coupler, a 10 position Manifold Assembly, and all the necessary plugs and fittings. This kit will allow the Super Server to be coupled with up to 9 QS-350 machines, and diverts air pressure to each machine. However, you will need to purchase an additional pressure relieving-style air regulator and 150 psi gauge to vary and monitor the air pressure coming into your Super Server.
Yes we do! We have an instructional video where we demonstrate the process of building bowstrings on our Super Server Serving Machines.
It is over an hour long of instruction, you’ll learn what equipment to use, how to lay up strings and cables, twisting, how to check for peep rotation, how to determine string/cable length, serving and many other tips and tricks that will guide you to make your own bowstrings.
With BCY 3D serving (.016” diameter), it takes approximately 45 seconds to completely fill a spool. To see a video of it in
action, follow this link: https://www.youtube.com/watch?v=FORI9el5Bpw
We have not found any bulk spools (1 pound, ¼ pound, or 1/8 pound) that the Serving Jig Winder does not work with.
We have not found any hand serving jig spools that the Serving Jig Winder does not work with.
DOUBLE VISION LENS SYSTEM
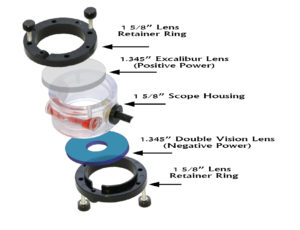
The Double Vision lens system is a 2-lens system. it offers versatility and customizability. The Double Vision lens system pairs two lenses together (a positive power lens and a negative power lens) and allows for any center spot positive power to be coupled with any other outside negative power and hole diameter. NOTE: The Double Vision lens system is compatible with the 1 3/8″ (#040-2), 1 5/8″ (#040-1), or Versa² (#V2TG) Specialty Archery scope housings, the TRU Ball Axcel X-31 and the CBE Small 1 3/8″ scopes only (additional components may be required). The Double Vision system will not work with most other manufacturers’ scope housings due to the fact that the scope must hold 2 lenses.
Double Vision Lenses available in the following color tints:
- Amber
- Blue
- Red
- Smoke
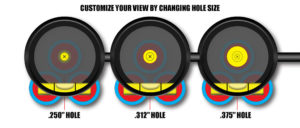
Available with the following hole sizes:
• 0.250” (1/4″)
• 0.312” (5/16″)
• 0.375” (3/8″)
• Custom hole sizes also available for an additional charge.
Available in the following powers
• -2X
• -4X
• -6X
• -8X
Specialty Archery Versa (#040-5) Scope Housing.
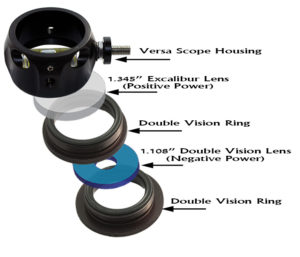
The Versa Scope comes with the Double Vision Lens Retaining Ring. All that is needed are lenses.
1.) Specialty Archery Excalibur lens 1.345” diameter
2.) Double Vision lens 1.108” diameter
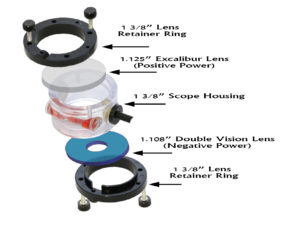
Specialty Archery 1 3/8” scope housing (#040-2)
1.) Specialty Archery Excalibur lens 1.125” diameter
2.) Double Vision lens 1.108” diameter
3.) Specialty Archery Plain Lens Retainer ring (0416 1 3/8”)
Specialty Archery 1 5/8” scope housing (#040-1)
1.) Specialty Archery Excalibur lens 1.345” diameter
2.) Double Vision lens 1.345” diameter
3.) Specialty Archery Plain Lens Retainer ring (0416 1 5/8”)
If you increase the distance from your eye to your lens (by extending your sight further), the apparent power/magnification of the lens will increase. For example, if you have your sight extended 3” from the bow, and you move it out to 6” from the bow, the apparent power/magnification will increase. This will cause the target image to be larger in size. Consequently, the area of the target you see in the hole in the Double Vision lens will decrease. That is why as a general rule of thumb we recommend a 0.250” (1/4”) center when using a +4X lens (lower power), but a larger 0.312” (5/16”) hole when using a more powerful +6X lens. Shooters can use their sight extension to fine-tune the area of the target seen through the center of the scope.
Increase distance from eye to scope lens:
1. Increased apparent power/magnification of the lens.
2. Target appears larger.
3. Target area (field of view) seen in the hole of the Double Vision lens appears smaller.
Conversely, if you decrease the distance from your eye to your lens, the apparent power/magnification of the lens will decrease as well. This will cause the target image to be smaller in size. Consequently, the area of the target you see in the hole in the Double Vision lens will increase.
Decrease distance from eye to scope lens:
1. Decreased apparent power/magnification of the lens.
2. Target appears smaller.
3. Target area (field of view) seen in Double Vision lens appears larger.
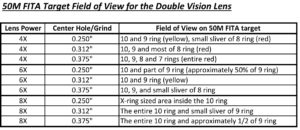
Field of view when using the Double Vision system depends on the positive lens power, the hole size in the Double Vision lens, the archer’s draw length and the amount the sight is extended on the sight bar (see above).
The following fields of view were established at a 34″ peep sight-to-scope distance.
Possibly. It will only work with a few non-Specialty Archery scopes: the TRU Ball Axcel X-31 and the CBE (Custom Bow Equipment) small 1 3/8” scope housing. The Double Vision system will not work with most other scopes because it requires the capability of holding 2 lenses in the scope at the same time.
To use the Double Vision system with the TRU Ball Axcel X-31, you will need to use 2 of the lens frames as well as the red spacers included with the scope. First, install the positive power lens into the first lens frame, followed by one of the red spacers, and install these into the scope housing. Next, install a 1.345” Double Vision lens into a second lens frame and install it into the scope housing. Finally, screw the Lens Retainer into the scope housing to hold the lenses, lens frames, and red spacers in place. The X-31 is now set up for use with the Double Vision lens system.
Check out a video of the Double Vision and Axcel X-31 at:
To use the Double Vision system in the CBE small 1 3/8” scope housing, you will need to purchase a Specialty Archery Double Vision Lens Retainer Ring for the CBE Scope (#RRDVCBE) and a 1.108” Double Vision Lens. The CBE Double Vision Lens Retainer Ring is actually a 2-piece lens retainer ring system that holds both the positive power lens and the Double Vision lens in close proximity. The inner ring holds the positive power lens, and the outer ring holds the Double Vision lens.
Check out a video of the CBE Double Vision Lens Ring at:
Yes, you can indeed use the Double Vision lenses for field archery. However, there are some unique challenges when using these lenses for field archery. In field archery, there is a consistent target size shot at multiple distances. For example, the same target size is used for 20, 25 and 30 yards. The next target size is used at 35, 40, 45 and 50 yards. So, the targets will appear different sizes when seen at different yardages when aiming. We recommend using a setup that has a grind or center hole that fits the target fairly “tightly” at the closest distance (i.e. the target nearly fills the center section of the Double Vision lens at 20 yards). As the same size target is encountered at 25 and 30 yards, it will fill less and less of the center section of the lens, making precise aiming more difficult at the longer yardages. However, it can still be done, provided the shooter is careful when aiming.
We do not recommend the Double Vision lens for 3D shooting. Locating an unmarked scoring ring on a 3D target can be difficult with the Double Vision lens system. The Double Vision lens work best for shooting spots or dots. We recommend a standard power lens of 2X-6X in one of our 3D sized scope housings for 3D shooting rather than a Double Vision lens. Additionally, we recommend the use of a fiber optic Glow Pin for 3D shooting.
Yes, clarifiers actually work very well with the Double Vision lenses. Since the Double Vision lens eliminates the need for a pin or dot for aiming, a clarifier can bring the magnified X into very sharp focus. This is a personal preference, as many people shoot the Double Vision lens without a clarifier as well. However, your target image will be much clearer when using the correct clarifier power with the correct lens power. For suggestions, please see “Clarifier” section of the FAQ’s.
Yes, one of the services we offer is custom sizing of lenses to fit other manufacturers’ scope housings. We have an extensive database of factory lens sizes to fit most archery scopes. Please allow 2-3 weeks for completion of custom sizing. Custom lens sizing will incur an additional $10.00 charge, and custom lens sizes are non-refundable and non-returnable. Note: The Double Vision lens system is not usually compatible with other manufacturers’ scope housings, as it requires the use of a Lens Retaining Ring system that holds 2 lenses. Exceptions are the TRU Ball Axcel 31 and the CBE Small scopes.
SCOPES, LENSES & GLOW ACCESSORIES
The Versa³ (#V33D) and Super D Scope (#1011) are primarily used for 3D, but can also be used for indoor and outdoor target and field shooting. The benefit of these larger scopes to a 3D shooter is that the larger field of view allows the shooter to see the front leg, back and belly line of the 3D animals so he will be better able to determine exactly where he is aiming on the target.
The Versa² (#V2TG) and 1 3/8″ Super Scope (#040-2) are recommended for indoor and outdoor target and field shooting. These scopes are smaller in diameter than those recommended for 3D shooting, since a smaller diameter scope and peep generally increase accuracy. Also, since you will be shooting at a target with some sort of aiming dot, you will not need to see the outline of the animal. Lastly, the smaller diameter of these scopes will allow for sufficient arrow clearance when the scope is moved downwards when shooting very long distances, such as in field archery or 90 meter FITA events.
The 1 5/8″ Super Scope (#040-1) is for indoor and outdoor target and field shooting, but can also be used for 3D shooting if using a low power lens (2X or 3X).
The Versa Scope is the most versatile scope Specialty Archery has ever designed. The Versa scope accepts Specialty Archery’s 1.345” diameter lenses. Additionally, the Versa Scope comes with the lens Double Vision retainer ring, so you can use the Double Vision system as well without the need to purchase an additional lens ring. Also, the Versa Scope does not require the use of a Glow Ring if the shooter wants to use a fiber optic aiming dot. The new Versa Scope uses a Glow Pin (GP1), which is available in 0.010”, 0.020” or 0.030” diameter.
When using a scope and lens, shooters often use a peep with too large of an aperture. A typical hunting peep with a 3/16″ or 1/4” opening will usually not work for a scope. Too large a peep will make the target blurry. You will need a peep with a much smaller aperture to use a lens. 1/16″ is a very common size when using a scope and lens. A good rule of thumb is that the more powerful the scope lens, the smaller the hole in the peep has to be to properly focus on the target. However, decreasing in aperture size will cause the sight picture to be darker. Another thing that will help clear up the target image is a clarifier. However, clarifiers can also create issues, such as making the aiming dot in your scope blurry. See the FAQ section on “Clarifiers” for further information.
No, this is not recommended. A bow scope with a lens requires the use of a peep sight in the string. If you try to use a scope without a peep sight, the target image will be extremely blurry. Even so, using too large of a peep aperture will lead to a blurry target downrange.
The lens for the 1 3/8″ scope measures 1.125″.
The lens for the 1 5/8″ (#040-1) or Versa² (#V2TG) scope measures 1.345″.
The Super D lens measures 2.167″ wide x 1.905″ tall.
The Versa³ scope lens measures 1.75″.
For target or spot archery (Indoors, Field, and FITA style shooting) the 4X and 6X lenses are most common. For 3D Archery the 3X and 4X lenses are most common. These guidelines are general, and may not work for you. People use a variety of lenses for all types of archery. Some people prefer a 2X or 3X for target shooting, and others prefer a 6X for 3D shooting. It is a trial and error situation to find what works best for each individual.
The diopter of a scope lens is the lens power divided by 8.
2x lens = 0.25 diopter
3x lens = 0.375 diopter
4x lens = 0.5 diopter
6x lens = 0.75 diopter
7x lens = 0.875 diopter
8x lens = 1.0 diopter
This means that the fiber diameter is slightly too small for the drilled hole in the lens. Wrap a small piece if transparent tape around the end of the fiber that is inserted in the lens hole.
Draw length is very important for determining “apparent” lens power. If you hold a lens close to your eye, you will notice that the apparent magnification seems very low. However, if you begin to move the lens away from your eye, you will see the “apparent” magnification of the lens becomes greater and greater. This is why people with different draw lengths often see different sight pictures, even with the same power lens.
If an archer EXTENDS the sight bar out (moving the lens farther away from the eye), the “apparent” power of the lens will INCREASE, and the field of view seen through the lens will DECREASE.
If an archer RETRACTS the sight bar in (moving the lens closer to the eye), the “apparent” power of the lens will DECREASE, and the field of view seen through the lens will INCREASE.
The following fields of view were established at a 34″ peep sight-to-scope distance.
Keep in mind the following rules: If an archer EXTENDS the sight bar out, the power of the lens will INCREASE, and the field of view seen through the center lens will DECREASE. If an archer RETRACTS the sight bar in, the power of the lens will DECREASE, and the field of view seen through the center lens will INCREASE.
Color is mostly a matter of personal preference, but here are some guidelines:
Green is the most brilliant, followed by red, then blue. Green and red are best for indoor shooting since they are the most brilliant, but they are also suitable for outdoor shooting. However, green may be too bright when shooting outdoors on a sunny day. You may place a piece of black electrical tape over the fiber to “dim it down” for bright sunny days. Blue is best used outdoors on bright sunny days. Indoors or in low light situations, blue is very difficult to see.
Red is easily visible outdoors, but may be hard to see in poorly lit indoor ranges.
This largely depends on personal preference. Green is the most popular color. For 3D shooting, customers prefer either the smaller 0.020” or a 0.010” pin. For target, people usually chose a 0.020” or a 0.030” pin. The 0.020” pin is the most popular overall.
The redesigned Glow Rings, introduced in 2014, have part numbers which reflect which scope they are compatible with. Additionally, the pins in the glow rings are available in 0.010”, 0.020”, and 0.030” diameters. The glow rings come with green fiber installed, but they also have red and blue fibers included.
GR2-020 = Glow Ring for 040-2 scope, 0.020” diameter pin.
Glow – Ring Scope
GR1 – 040-1
GR2 – 040-2
GR3 – 040-3
GR4 – 040-4
GRD – Super D
Yes, the pin on the new Glow Rings is replaceable. Or, if you wish to change fiber size, the pins can also be interchanged with the purchase of a new Glow Pin (GP). Pins on our older style glow rings were not replaceable or exchangeable
SUPER 7 BRIGHT SIGHT
There are many variables that affect battery life, such as ambient temperature, brightness setting, battery type, etc. Basically, the Super 7 will last approximately 6.5 hours, or 78 cycles at 5 minutes each, on full brightness. Also, use of a lithium battery is recommended for extended battery life.
The Super 7 Bright sight has 7 colors available. The colors are: green, blue, light blue, red, amber, violet, and white. If the shooter needs to change color, all that is required is to depress the “Color” button. For example, when encountering a white target such as a billy goat on a 3D range, a green pin often blends in with the target, making it difficult to see. The shooter can change pin color from green to red, make the shot, and continue to the next target. The Super 7 also uses a single AAA battery, which are less expensive and more readily available than other types of batteries. The Super 7 shuts off after 5 minutes to preserve battery life. The Super 7 also has the ability to check battery status. This is accomplished by pressing and holding the “ON/OFF” button when first turning the unit on. Below are the colors and indications noted when performing this procedure:
Green = Battery is new.
Blue = battery is at its mid-life.
Red = battery is low, time to replace battery.
To use the Super 7, you will first need to replace the colored fiber in your current fiber optic sight pin with the clear fiber in the Fiber Kit. Fiber Kits include 0.010”, 0.019” and 0.029” diameter clear fibers. The Fiber Kit will align the end of the fiber optic in your scope with the LED lights in the threaded end of the cable attached to the Super 7. Once the fiber has been replaced, the fiber and shroud will need to be terminated within the threaded female receiver included with the Fiber Kit. Included with the Fiber Kit is a rubber compression washer which holds the fiber and shroud in place inside the female receiver. Mounting hardware is included with the Fiber Kit.
Most likely the battery is dead. Try replacing the battery first. And, make sure the new battery you are replacing it with is not dead as well. We have had Super 7 units that were returned for warranty work that simply had a dead battery.
The Super 7 requires the use of 1 AAA battery. Lithium batteries are preferred for longer life.
No, the Super 7 is not legal for FITA, as it is an electronic device. The Super 7 is legal for all other types of competitions, such as NFAA, IBO and ASA.
Yes, but you will need to purchase a Fiber Kit. Fiber kits come with 0.010”, 0.019” and 0.029” diameter clear fibers. To adapt the Super 7 to a different manufacturers’ scope, you will need to replace the fiber in your current scope with the clear fiber in the Fiber Kit. And, some modification may be required to secure the threaded male end of the Super 7 cable to the threaded female receiver included with the Fiber Kit. Mounting hardware is included with the Fiber Kit.
STABILIZERS
Stabilizers have 2 basic functions. The first is to improve balance of the bow to improve aiming. The second is to reduce vibration and noise. Specialty Archery stabilizers accomplish vibration reduction with the use of Sims Vibration Labs NAVCOM material. Balance and aiming are improved by varying the amount and location of the weights on the stabilizers.
There are several questions that you need to answer to properly choose a stabilizer.
What is the purpose of the bow?
Hunting – generally select a shorter, lighter stabilizer. Hunting stabilizers are usually 12″ or less, such as one of our Feather Lite hunting stabilizers or one of our shorter Ultra Lite stabilizers. This shorter length makes the bow more maneuverable in a treestand or ground blind. The main focus on hunting length stabilizers is usually the reduction of vibration and noise.
Target and 3-D shooting – generally use a longer, heavier stabilizer. The Pro Stix is the most popular model for target and 3D shooting, although many who prefer a lighter stabilizer choose the Ultra Lite. Many target shooters also use a V-bar with either 1 or 2 additional rear-mounted stabilizers. In many cases, a V-bar can help the shooter achieve proper vertical alignment of the bow when at full draw. The most common lengths for front stabilizers are 24″ and 36″. The rear-mounted stabilizers attached to V-bars are usually between 12” and 15”.
What is the physical size and strength of the archer?
Small woman or child – generally prefer a lighter stabilizer, such as one of our Ultra Lite stabilizers.
Adult Male – generally prefer slightly heavier stabilizer, such as a Feather Lite for a hunting bow or a Pro Stix for a target bow.
Choosing the amount of stabilizer weight is a personal decision. We recommend starting with a moderate amount of weight, and adding or subtracting weight to improve the sight picture when at full draw. Some archers prefer a fairly heavy bow, while others prefer a lighter bow. Once the overall weight of the bow is established, the archer can now experiment with positioning of the weights to further steady the sight picture. Some people prefer a great deal of front stabilizer weight, while other archers prefer less front weight. If you are using a V-bar, experiment by removing an ounce or two from the V-bar and adding it to the front stabilizer. If the sight picture improves, you may want to move another ounce or two from the V-bar and put it on to the front bar. If the sight picture worsens, you may want to try removing weight from the front rod and putting it on one of the V-bar rods.
All Specialty Archery stabilizers come with a Quick Disconnect (QD) as an integral part of the stabilizer. Stabilizers often need to be removed from the bow for transportation in a bow case, especially target bows with very long stabilizers. A QD allows quick and easy removal of the stabilizer from the bow. A QD works by simply turning the stabilizer ½ turn and removing it from the stabilizer lug. To re-install, the stabilizer is placed back over the lug, and tightened. This is much quicker than completely unscrewing the stabilizer from the bow.
BODOODLE
Bodoodle Switchblade
- Available in 2 configurations – the Switchblade Hunter (with Speed or Hunter Fins) and the Switchblade Target (with a Lizard Tongue Launcher Blade) – can be easily converted by switching yokes.
- Has a wider and taller frame and yoke for added fletching clearance.
Switchblade Hunter:
- Wider and taller frame for added clearance of high profile vanes over our Pro Lite II.
- With the purchase of the Target Yoke (#SBTY), the Switchblade Hunter rest can be converted to a Switchblade Target in seconds.
- Comes standard with 2 stainless steel .015” thickness Speed Fins (installed) & 2 stainless steel .015” thickness Hunter Fins. Other Fins available.
Switchblade Target:
- Wider and taller frame for added clearance of high profile feathers on large diameter indoor arrows over our Timber Rattler II.
- Stainless Steel .010” & .012” Lizard Tongues with built in vibration dampener comes standard. * The .010” Lizard Tongue comes installed on the rest.
- Fully adjustable yoke system allows the shooter to tune the blade by adjusting the spring tension on the yoke.
- With the purchase of the Hunter Yoke (#SBHY), the Switchblade Target rest can be converted to a Switchblade Hunter in seconds.
Switchblade Yokes:
- The Switchblade Target Yoke (#SBTY) comes with .010” & .012” Lizard Tongues. *Must specify RH or LH.
- The Switchblade Hunter Yoke (#SBHY) comes with both .015” Speed & Hunter Fins. *Can be converted from RH to LH.
The popular Zapper 300 and Zapper 400 have been redesigned with an improved mounting and adjustment system – the Zapper X bracket!
- The X bracket allows 1/2″ of vertical and 1″ of horizontal adjustment of the Zapper arrow rest.
- Laser etched vertical and horizontal marks make tuning easier than ever.
- Still features top-loading convenience and full containment of the arrow shaft.
- Zapper X bracket is available on the Zapper 300X and the Zapper 400X.
Rest fins should be positioned to allow for adequate support of the arrow shaft, but still provide complete fletching clearance. If you are noticing marks or damage on your fletching, you may need to either widen the rest fins or reposition your nocks to provide full fletching clearance. See diagram below showing correct fletching orientation:
The spring tensions come pre-set from the factory, but better groups may be obtained by using a slightly stiffer or weaker spring tension. As a general rule, set the tension initially so that it will keep the rest in the full upright position when the arrow is nocked and sitting on the rest. From here, you may achieve better groups by going to a slightly heavier or lighter spring tension.
We recommend one of the Timberdoodle series (Timberdoodle, Timberdoodle 2, or Timberdoodle HP), or the Pro 500 for finger shooters. The Timberdoodle series have a rest fin on the lateral position of the arrow to provide some cushioning needed for a finger release. The Vernier adjustment capability on the Pro 500 also allows the rest to be adjusted so that it has rest fins in the correct position for a finger shooter.
All Bodoodle rest models come with Teflon silencing “Smoke Quiet Tape” included. This tape should be put over the ends of the fins to silence the noise made when an arrow is drawn over the rest. Customers have also reported success using fingernail polish, moleskin, and shrink tubing placed over the rest fins. Whenever the silencing material wears out, it is time to replace it. Another good idea is to put some moleskin on the areas around where your arrow may bump the rest, so as to prevent the metallic clicking from spooking game. An accessory from Bodoodle is also the “Doodle Slicks”, which can also be placed over the fins to make for a silent draw.
Smoke Quiet Tape is very thin, so this eliminates the need for re-tuning or re-sighting your bow after installation. If you use Doodle Slicks, you may need to re-tune and re-sight your bow after installation due to the increased thickness of the Doodle Slicks. However, due to the increased thickness, the Doodle Slicks do tend to last longer than the Smoke Quiet Tape.
Rests come standard with .015 thickness fins. There are also .023 thickness fins available. Sometimes shooters feel they shoot better groups with a thicker set of fins. Other times, the thicker fins may be preferred by archers using heavier arrows (over 500 grains).
Speed fins in .015 thickness come standard on most Bodoodle rests. There are also Hunter fins available; however the Speed fins are more popular. Speed fins are narrower and offer better fletching clearance, especially with small diameter carbon arrows. One drawback of the Speed fins is that the arrows tend to fall off the rest easier. Hunter fins are wider and cradle the arrow better, reducing the likelihood that it will fall off the rest when drawing. However, the drawback to these wider fins is that they do not offer as much fletching clearance as the Speed fins do.
CLICK HERE TO VISIT THE BODOODLE FIN PAGE
The different thicknesses of the blades on the Timber Rattler are also used for different weights of arrows.
For arrows under 325 grains .008” launcher
For arrows 325 – 425 grains .010” launcher
For arrows over 425 grains .012” launcher
Also, for large diameter indoor arrows with very heavy points, shooters have reported good results using 2 .010” launchers stacked together.
The most popular rests for target shooting is the Switchblade Target arrow rest.
All of the Bodoodle models would be suitable for hunting, with the exception of the Switchblade Target arrow rest. These are used primarily for target and 3D competition.
You may contact Specialty Archery to obtain replacement parts:
1211 38th Ave. W PO Box 879
Spencer, IA 51301
www.specialtyarch.com
Quick Range
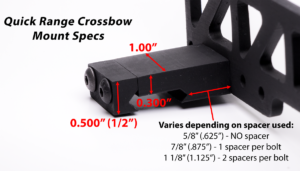
The Quick Range is a rangefinder mount that allows you to use your regular rangefinder mounted directly to your bow or crossbow. It is compatible with most rangefinders and bows on the market, and mounts to bows using standard sight mounting holes. Mounts to crossbows using the existing picatinny rail/scope mounting rail.
The Quick Range eliminates excess noise and movement associated with using a traditional rangefinder. It also places the rangefinder in a convenient position for ranging a target immediately before taking a shot.
The RH or LH on the Quick Range Crossbow refers to the side of the optics the rangefinder is mounted on. The Quick Range Crossbow RH will mount the rangefinder on the RH side of the crossbow’s optics. The LH mounts the rangefinder on the LH side of the optics. It is a matter of personal preference which side of the optics the Quick Range is mounted. A RH shooter may use the Quick Range Crossbow LH if he/she prefers the rangefinder to be mounted to the left side of the crossbow’s optics.
Check your state/province regulations for legality of bow-mounted electronics.


